skip to main |
skip to sidebar
Last night was full of cooking and baking. Drue made her very first bento box lunch (I'll explain what that is in another post) and Kat and I made Ginger Lime Cupcakes.I don't like ginger usually but these cupcakes are delicious. Since it's finally getting warm and pretty outside we decided to make these spring themed cupcakes...mainly because Kat loves themes. They're cute though! Check them out... Too cute! Yes, I know. Kat has also made Orange Poppy seed cupcakes from the same recipe book, and we both agreed that for some reason the cupcakes in that book always come out super fluffy and light, which is awesome. The book is called...well, I can't find it right now but I'll put it up here soon. Good book, great book, awesome cupcakes.So! For Ginger Lime cupcakes you need lime zest and juice, chopped candied ginger (which is about as easy as finely chopping gummy bears), coconut, milk, eggs, sugar, and flour. Am I missing anything here? Like I said I can't find that damn book...
 It's a pretty quick cupcake. The weird thing is the icing which isn't really an icing at all - more like a lime glaze. Hopefully you can see it in the pictures. I was positive I was screwing up the recipe when making it, but no. It's supposed to look that way. And you only use a very little bit when putting it on the cupcake. Probably only about a marble-sized amount.We decided to add the sprinkles and spring-time decorations but of course you can add or not add whatever you want. Personally, I would have liked to use these...
 WHICH can be found at the Cake Art Party Store in Tucker, Georgia. I've never been but that's where blogger Bakerella gets all of her stuff. What's that? Kat and I should go there next week and lose our minds over sprinkles, edible glitter dust, air brushing tools and cupcake pans? OKAY, WILL DO! I'm a little scared of how much money may be lost in this store. Poof, gone.
One of my favorite things to bake here at home is cupcakes. I'm always looking for new and different cupcake ideas, and when I came across this one at cupcakeproject.com, I knew I had to try them out. I present to you, Olive Oil Cupcakes with Lemon and Thyme and a Balsamic Vinegar Whipped Cream!
 Okay, so I know the picture isn't great but my refrigerator had the best lighting. And I know the idea of cupcakes made without butter and with savory ingredients sounds gross but...get over it because these cupcakes are amazing! You won't regret trying them. Moving on!
To make these cupcakes you need everything mentioned in the title (olive oil, lemon zest and juice, fresh thyme, balsamic vinegar, heavy whipping cream) along with sugar, flower, a pinch of salt, baking powder, and eggs.
It's not a very hard cupcake to make, and I managed to do it without a hand mixe r which decided to die on me as I started to combine the ingredients. Making the whipped cream by hand was a bit tiring but in no way impossible to do. I also didn't have a piping bag so I put the icing bag using a fold-over sandwich bag. Not the prettiest, but I made it work.Some foodies might insist on using a very high quality olive oil for this recipe since you are using such a large amount (2/3 of a cup), but I used Kroger brand olive oil and they were still delicious in the end.Now, a lot of my friends were wary to try these, and the first bite is off-putting, but by the time you're done you only want more!To see the full recipe be sure to visit http://www.cupcakeproject.com/2008/05/olive-oil-cupcakes-with-lemon-thyme-and.html
 Today I wanted to share a cake idea that my roommate and I borrowed from another blogger, bakerella. This cake was so fun to make and was very appropriate since we made it on valentines day. In the end, it was beautiful and delicious!We made our own fondant by melting marshmallows with just a touch of water in the microwave. We added red food coloring (made especially for icing) for that candy-box red effect. If you add just a little almond or vanilla extract to the mixture, it makes the fondant taste even better. After adding a box of confectioners sugar and kneading for a (very) long time, you have fondant! Roll it out to your desired thickness and lay it over the cake covered with just a bit of icing and it will adhere nicely. Make sure that when you are working with the fondant that you have a nice non-stick surface to work on. We layed down some wax paper a
 nd covered it (and our hands) with crisco. It feels gross, but if you don't do it you'll be picking marshmallow goop off of your hands all day.To make the "truffles" we actually made what bakerella calls "cake balls". In order to make these, we crumbled up the extra cake we had left over from the main base and added a bit of cream cheese icing. After doing this, you should roll the mixture in to balls and then form them in to the desired shapes of your truffles. We did balls, squares, hearts...but there are more shapes you could try out. Be creative!After setting the cake balls on some parchment papers and putting them in the freezer for at least 30 minutes, you're ready to dip them in chocolate.
  Melt down some chocolate pieces in the microwave, cover the cake balls and then let them cool and harden on parchment paper.Now comes the fun part of decorating! We used colored melt-able candy in tubes to make the designs on the truffles. We also used heart-shaped sprinkles, coconut, and colored sugar. Place the completed truffles in fluted cups and TA-DAAA! You have your delicious candy box cake. Enjoy, and share!
Be sure to visit bakerella's blog to see her version of the candy box cake, and all the other sweet treats she creates!
www.bakerella.com
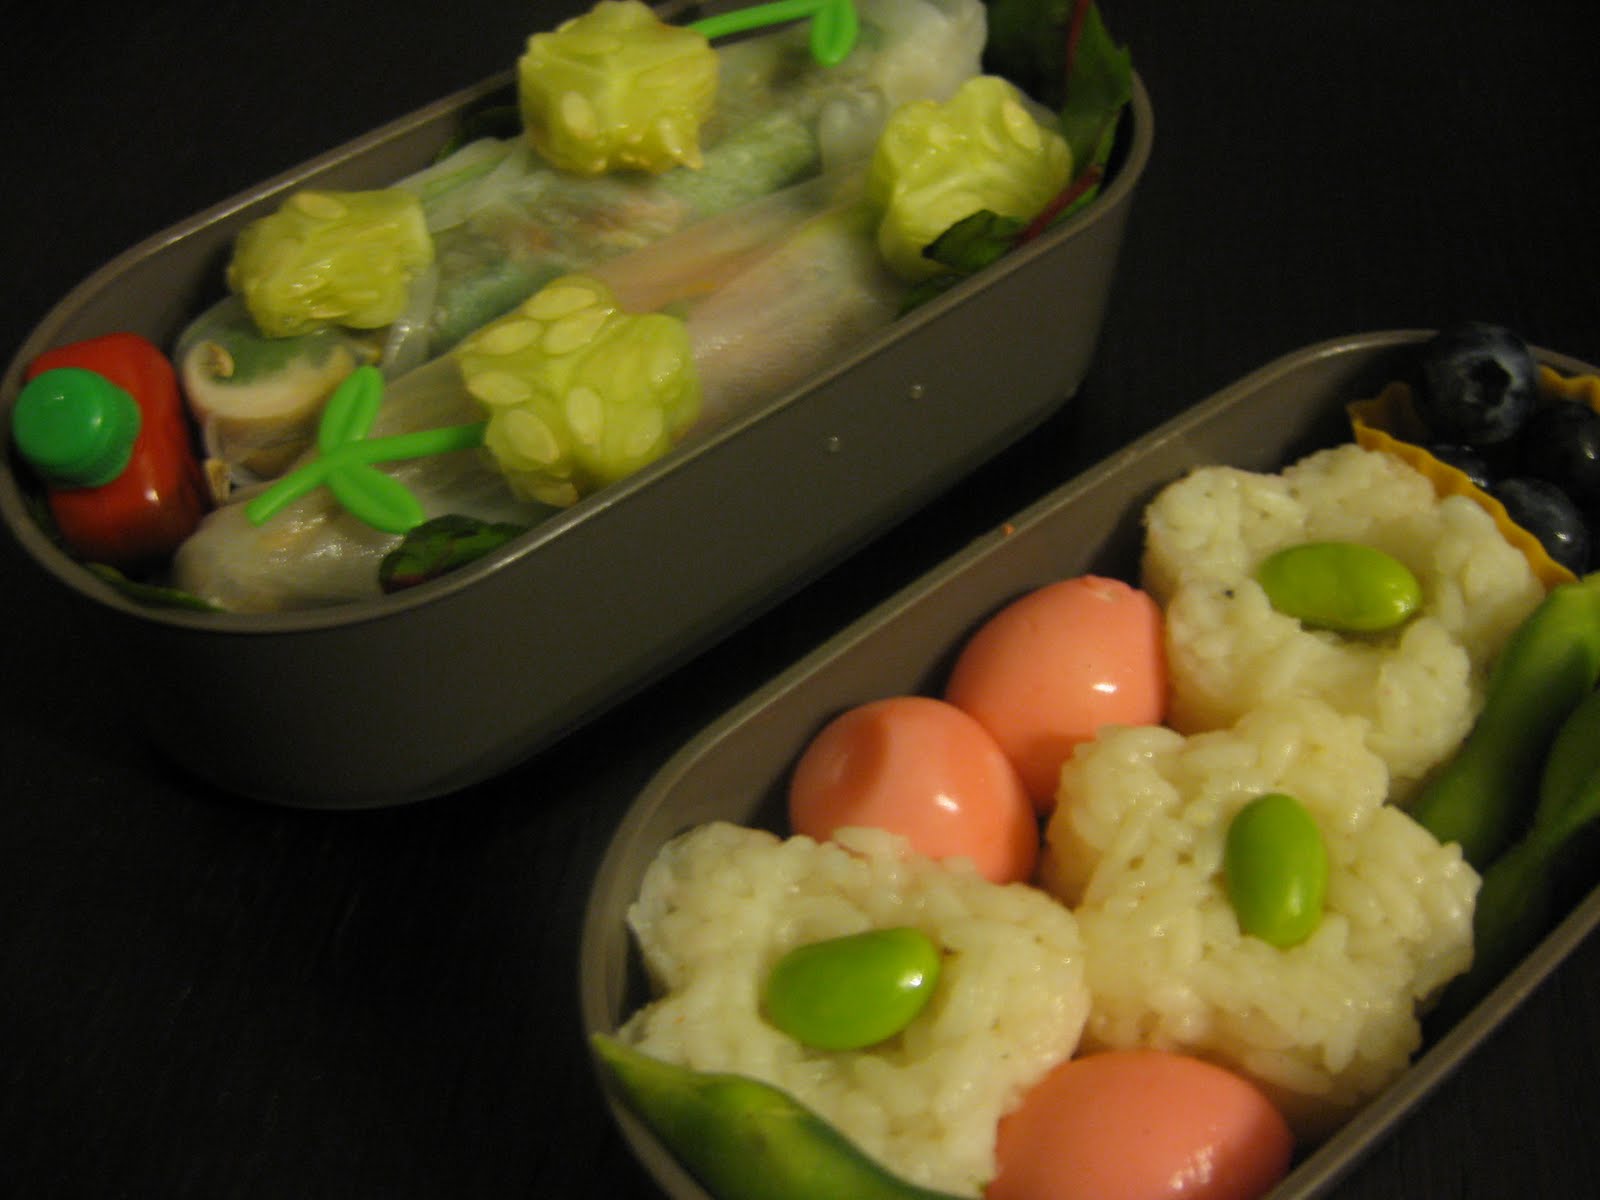
 This one is flower themed if you couldn't tell. Spring rolls along with cucumber, blueberries, edamame, rice, and quail eggs. The little container on the left is in the shape of a strawberry and holds a tiny portion of soy sauce. Adorable! Good job Drue!


